There is a code for the creation of Menu using HTML and CSS. In this tutorial, we will create menus by two method :-
1. Embedded CSS
2. External CSS
1. Embedded CSS :- This means we will include all the css rules in the <style> tag which will be declared in the same file, under the <head> tag. For Example:
i. First of all create a HTML document in notepad. as Menu.html
Menu.html
<html>
<head>
<title> menu</title>
</head>
<body>
<div id="nav">
<ul>
<li><a href="#" class="active">Home </a></li>
<li><a href="#">About Us </a></li>
<li><a href="#">Products </a></li>
<li><a href="#">Services </a></li>
<li><a href="#">Caontact us </a></li>
</ul>
</div>
</body>
</html>
When we execute this above page on the web browser, it will be seen as figure 1.
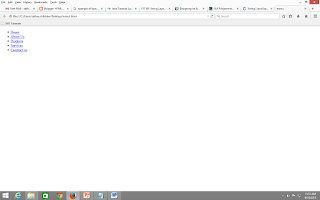
We are getting our unordered list and all our hyper links.
ii. Now we have to set our css formating to convert this unordered list to a horizontal menu bar in the <style> tag because here we are using the embedded style sheet. As we had included our <ul> tag in the <div> tag so first we have to style <div id="nav">
In Style sheet rules we have to give a # sign to declare the style of an ID. So we will include it like this.
<html>
<head>
<title> menu</title>
<style>
#nav
{
height:42px;
background-color:cornflowerblue;
}
</style>
</head>
<body>
<div id="nav">
<ul>
<li><a href="#" class="active">Home </a></li>
<li><a href="#">About Us </a></li>
<li><a href="#">Products </a></li>
<li><a href="#">Services </a></li>
<li><a href="#">Contact us </a></li>
</ul>
</div>
</body>
</html>
iii. When we include this rule to our style our screen will change as Figure 2

iv. To create a menu we do'not need any bullets so to remove bullets we give the following css rule and after execution of this rule our screen will be change as Figure 3.

<html>
<head>
<title> menu</title>
<style>
#nav
{
height:42px;
background-color:cornflowerblue;
}
#nav ul
{
list-style:none;
}
</style>
</head>
v. Now we have to code for the <li> tag which is inside the <ul> tag. There is no change in the <body> part so i am not mentioning it again and again. You people have to add only the highlighted code in your code.
<head>
<title> menu</title>
<style>
#nav
{
height:42px;
background-color:cornflowerblue;
}
#nav ul
{
list-style:none;
}
#nav ul li a
{
float:left;
text-decoration:none;
color:white;
padding : 0px 40px;
text-align:center;
line-height:42px;
height:42 px;
}
</style>
</head>
vi. After this code our screen will look as Figure 4.

vii. Now we will add the code for the mouse over event on a hyperlink. The below highlighted code will change the color of our selected hyperlink which will be shown in the figure 5.
<head>
<title> menu</title>
<style>
#nav
{
height:42px;
background-color:cornflowerblue;
}
#nav ul
{
list-style:none;
}
#nav ul li a
{
float:left;
text-decoration:none;
color:white;
padding : 0px 40px;
text-align:center;
line-height:42px;
height:42 px;
}
#nav ul li a:hover
{
background-color:white;
color:Cornflowerblue;
border-radius:8px;
}
</style>
</head>

viii. Now we can add the code for changing the color of the body as black by giving the background-color of the <body> tag in css and for the more formatting do the changes on
#nav ul li a.active which will be shown when our hyperlink will be active.
<style>
#nav
{
height:42px;
background-color:cornflowerblue;
}
#nav ul
{
list-style:none;
}
#nav ul li a
{
float:left;
text-decoration:none;
color:white;
padding : 0px 40px;
text-align:center;
line-height:42px;
height:42 px;
}
#nav ul li a:hover
{
background-color:white;
color:Cornflowerblue;
border-radius:8px;
}
body
{
background-color:black;
}
#nav ul li a.active
{
background-color:white;
border-radius:8px;
color:cornflowerblue;
}</style>
so complete code is
<html>
<head>
<title> menu</title>
<style>
#nav
{
height:42px;
background-color:cornflowerblue;
}
#nav ul
{
list-style:none;
}
#nav ul li a
{
float:left;
text-decoration:none;
color:white;
padding : 0px 40px;
text-align:center;
line-height:42px;
height:42 px;
}
#nav ul li a:hover
{
background-color:white;
color:Cornflowerblue;
border-radius:8px;
}
body
{
background-color:black;
}
#nav ul li a.active
{
background-color:white;
border-radius:8px;
color:cornflowerblue;
}
</style>
</head>
<body>
<div id="nav">
<ul>
<li><a href="#" class="active">home </a></li>
<li><a href="#">About Us </a></li>
<li><a href="#">Products </a></li>
<li><a href="#">Services </a></li>
<li><a href="#">Caontact us </a></li>
</ul>
</div>
</body>
</html>
After the complete code our screen would be look like as figure 6.
 This was an example of the Embedded style sheet.
2. External CSS :-
Now to convert this in the external style sheet example, we will follow some steps as:
From the above file create two separate files
1. menu.html
2. menu.css
Menu.html :- there is only on difference that we have to give the <link> tag in the head tag which will add our .css file when it will be executed on the browser.
<html>
<head>
<title> menu</title>
<link href="menu.css" rel="stylesheet" type="text/css">
</head>
<body>
<div id="nav">
<ul>
<li><a href="#" class="active">Home </a></li>
<li><a href="#">About Us </a></li>
<li><a href="#">Products </a></li>
<li><a href="#">Services </a></li>
<li><a href="#">Caontact us </a></li>
</ul>
</div>
</body>
</html>
menu.css
#nav
{
height:42px;
background-color:cornflowerblue;
}
#nav ul
{
list-style:none;
}
#nav ul li a
{
float:left;
text-decoration:none;
color:white;
padding : 0px 40px;
text-align:center;
line-height:42px;
height:42 px;
}
#nav ul li a:hover
{
background-color:white;
color:Cornflowerblue;
border-radius:8px;
}
body
{
background-color:black;
}
#nav ul li a.active
{
background-color:white;
border-radius:8px;
color:cornflowerblue;
}
This example will also give the same output as the embedded stylesheet.
1. Embedded CSS
2. External CSS
1. Embedded CSS :- This means we will include all the css rules in the <style> tag which will be declared in the same file, under the <head> tag. For Example:
i. First of all create a HTML document in notepad. as Menu.html
Menu.html
<html>
<head>
<title> menu</title>
</head>
<body>
<div id="nav">
<ul>
<li><a href="#" class="active">Home </a></li>
<li><a href="#">About Us </a></li>
<li><a href="#">Products </a></li>
<li><a href="#">Services </a></li>
<li><a href="#">Caontact us </a></li>
</ul>
</div>
</body>
</html>
When we execute this above page on the web browser, it will be seen as figure 1.
We are getting our unordered list and all our hyper links.
ii. Now we have to set our css formating to convert this unordered list to a horizontal menu bar in the <style> tag because here we are using the embedded style sheet. As we had included our <ul> tag in the <div> tag so first we have to style <div id="nav">
In Style sheet rules we have to give a # sign to declare the style of an ID. So we will include it like this.
<html>
<head>
<title> menu</title>
<style>
#nav
{
height:42px;
background-color:cornflowerblue;
}
</style>
</head>
<body>
<div id="nav">
<ul>
<li><a href="#" class="active">Home </a></li>
<li><a href="#">About Us </a></li>
<li><a href="#">Products </a></li>
<li><a href="#">Services </a></li>
<li><a href="#">Contact us </a></li>
</ul>
</div>
</body>
</html>
iii. When we include this rule to our style our screen will change as Figure 2

iv. To create a menu we do'not need any bullets so to remove bullets we give the following css rule and after execution of this rule our screen will be change as Figure 3.

<html>
<head>
<title> menu</title>
<style>
#nav
{
height:42px;
background-color:cornflowerblue;
}
#nav ul
{
list-style:none;
}
</style>
</head>
v. Now we have to code for the <li> tag which is inside the <ul> tag. There is no change in the <body> part so i am not mentioning it again and again. You people have to add only the highlighted code in your code.
<head>
<title> menu</title>
<style>
#nav
{
height:42px;
background-color:cornflowerblue;
}
#nav ul
{
list-style:none;
}
#nav ul li a
{
float:left;
text-decoration:none;
color:white;
padding : 0px 40px;
text-align:center;
line-height:42px;
height:42 px;
}
</style>
</head>
vi. After this code our screen will look as Figure 4.

vii. Now we will add the code for the mouse over event on a hyperlink. The below highlighted code will change the color of our selected hyperlink which will be shown in the figure 5.
<head>
<title> menu</title>
<style>
#nav
{
height:42px;
background-color:cornflowerblue;
}
#nav ul
{
list-style:none;
}
#nav ul li a
{
float:left;
text-decoration:none;
color:white;
padding : 0px 40px;
text-align:center;
line-height:42px;
height:42 px;
}
#nav ul li a:hover
{
background-color:white;
color:Cornflowerblue;
border-radius:8px;
}
</style>
</head>

viii. Now we can add the code for changing the color of the body as black by giving the background-color of the <body> tag in css and for the more formatting do the changes on
#nav ul li a.active which will be shown when our hyperlink will be active.
<style>
#nav
{
height:42px;
background-color:cornflowerblue;
}
#nav ul
{
list-style:none;
}
#nav ul li a
{
float:left;
text-decoration:none;
color:white;
padding : 0px 40px;
text-align:center;
line-height:42px;
height:42 px;
}
#nav ul li a:hover
{
background-color:white;
color:Cornflowerblue;
border-radius:8px;
}
body
{
background-color:black;
}
#nav ul li a.active
{
background-color:white;
border-radius:8px;
color:cornflowerblue;
}</style>
so complete code is
<html>
<head>
<title> menu</title>
<style>
#nav
{
height:42px;
background-color:cornflowerblue;
}
#nav ul
{
list-style:none;
}
#nav ul li a
{
float:left;
text-decoration:none;
color:white;
padding : 0px 40px;
text-align:center;
line-height:42px;
height:42 px;
}
#nav ul li a:hover
{
background-color:white;
color:Cornflowerblue;
border-radius:8px;
}
body
{
background-color:black;
}
#nav ul li a.active
{
background-color:white;
border-radius:8px;
color:cornflowerblue;
}
</style>
</head>
<body>
<div id="nav">
<ul>
<li><a href="#" class="active">home </a></li>
<li><a href="#">About Us </a></li>
<li><a href="#">Products </a></li>
<li><a href="#">Services </a></li>
<li><a href="#">Caontact us </a></li>
</ul>
</div>
</body>
</html>
After the complete code our screen would be look like as figure 6.

2. External CSS :-
Now to convert this in the external style sheet example, we will follow some steps as:
From the above file create two separate files
1. menu.html
2. menu.css
Menu.html :- there is only on difference that we have to give the <link> tag in the head tag which will add our .css file when it will be executed on the browser.
<html>
<head>
<title> menu</title>
<link href="menu.css" rel="stylesheet" type="text/css">
</head>
<body>
<div id="nav">
<ul>
<li><a href="#" class="active">Home </a></li>
<li><a href="#">About Us </a></li>
<li><a href="#">Products </a></li>
<li><a href="#">Services </a></li>
<li><a href="#">Caontact us </a></li>
</ul>
</div>
</body>
</html>
menu.css
#nav
{
height:42px;
background-color:cornflowerblue;
}
#nav ul
{
list-style:none;
}
#nav ul li a
{
float:left;
text-decoration:none;
color:white;
padding : 0px 40px;
text-align:center;
line-height:42px;
height:42 px;
}
#nav ul li a:hover
{
background-color:white;
color:Cornflowerblue;
border-radius:8px;
}
body
{
background-color:black;
}
#nav ul li a.active
{
background-color:white;
border-radius:8px;
color:cornflowerblue;
}
This example will also give the same output as the embedded stylesheet.
No comments:
Post a Comment